1.2. Usage
This package provides the handy Fringes class,
which handles all the required parameters
for configuring the fringe pattern sequence
and provides methods for encoding and decoding it.
1.2.1. Script
You instantiate, parameterize and deploy the Fringes class:
from fringes import Fringes  # import the Fringes class

f = Fringes()                # instantiate Fringes object
1.2.1.1. Configure
All parameters are accessible by the respective attributes
of the Fringes instance.
They are implemented as properties
(managed attributes), which are parsed when set.
Note that some attributes have sub-dependencies,
hence dependent attributes might change as well.
Circular dependencies are resolved automatically.
f.X = 1920                   # set width of fringe patterns to screen width
f.Y = 1080                   # set height of fringe patterns to screen height
f.N = 4                      # set number of shifts
f.v = [9, 10]                # set spatial frequencies

print(f.T)                   # get number of frames
1.2.1.2. Encode
For generating the fringe pattern sequence I, use the method encode().
It returns a Numpy array
in vshape(): frames T, width X,
height Y, color channels C.
I = f.encode() # encode fringe patterns
1.2.1.3. Record
Now display each frame of the fringe pattern sequence on a screen and capture the scene with a camera according to the following pseudocode (a minimal working example is given in the example below):
# allocate image stack
Irec = []

for t in range(f.T):
    # display frame of pattern sequence on screen
    frame = I[t]
    ...

    # capture scene with camera
    image = ...

    # append to image stack
    Irec.append(image)
1.2.1.4. Decode
For analyzing (recorded) fringe patterns Irec, use the method decode().
It returns the Numpy arrays brightness a, modulation b and (screen) coordinate x.
a, b, x = f.decode(Irec) # decode fringe patterns
Note
For the computationally expensive decode()-function
we make use of the just-in-time compiler Numba.
During the first execution, an initial compilation is executed.
This can take several tens of seconds up to single digit minutes, depending on your CPU and energy settings.
However, for any subsequent execution, the compiled code is cached and the code of the function runs much faster,
approaching the speeds of code written in C.
1.2.1.5. Example
The only hardware you need is a screen and a camera, cf. Fig. 1.1. The setup can be as simple as only using your notebook’s screen and integrated camera.
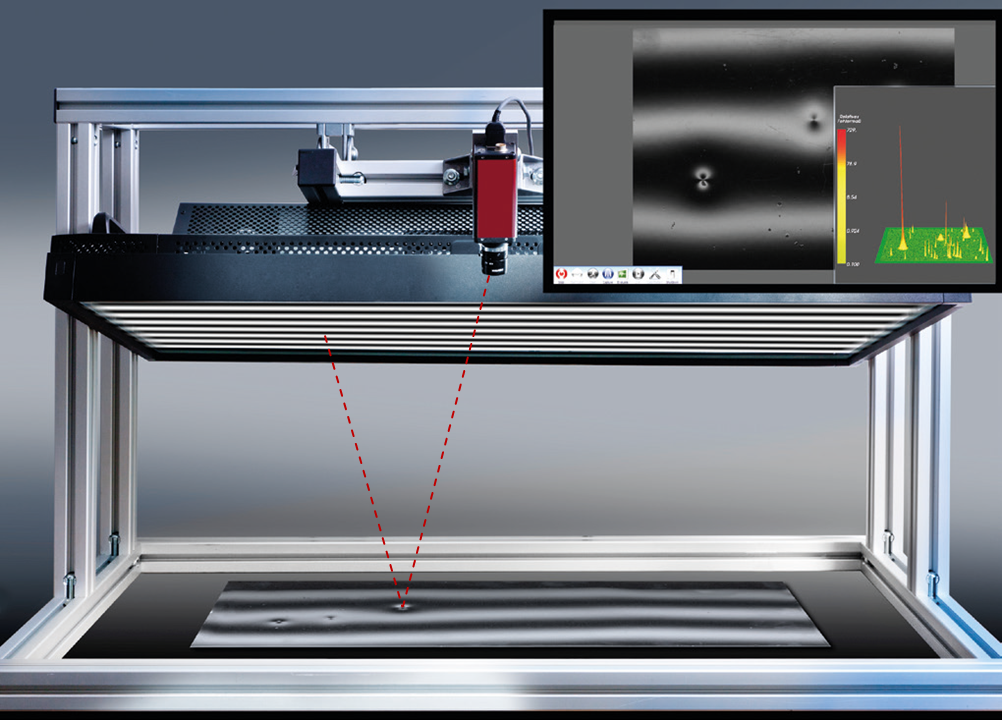
Fig. 1.1 Measurement setup for deflectometric inspection. Source: [1].
Make sure the reflected fringe pattern is visible by the camera. Also, make sure to focus onto the test object and adjust the exposure settings of the camera. Then you can use the following code snipped to record and decode your own dataset:
 1"""Configure, encode and record fringe patterns using `Fringes` and `OpenCV`."""
 2
 3import cv2
 4import numpy as np
 5from fringes import Fringes
 6
 7# prepare window (in which the fringe patterns will be shown in fullscreen mode)
 8cv2.namedWindow("Fringes", cv2.WND_PROP_FULLSCREEN)
 9cv2.setWindowProperty("Fringes", cv2.WND_PROP_FULLSCREEN, cv2.WINDOW_FULLSCREEN)
10left, top, width, height = cv2.getWindowImageRect("Fringes")
11
12# prepare camera
13camera = cv2.VideoCapture(1)
14
15delay = 500  # delay time of the screen until the image is actually shown
16white = np.full((height, width), 255, np.uint8)  # white image
17cv2.imshow("Fringes", white)  # display white image
18cv2.waitKey(delay)  # wait delay time
19
20camera.set(cv2.CAP_PROP_AUTOFOCUS, 1)  # turn on autofocus
21camera.set(cv2.CAP_PROP_AUTO_WB, 1)  # turn on white balance
22camera.set(cv2.CAP_PROP_AUTO_EXPOSURE, 1)  # turn on autoexposure
23
24for _ in range(100):
25    ret, image = camera.read()  # let camera set focus, white balance and exposure
26
27camera.set(cv2.CAP_PROP_AUTOFOCUS, 0)  # turn off autofocus
28camera.set(cv2.CAP_PROP_AUTO_WB, 0)  # turn off white balance
29camera.set(cv2.CAP_PROP_AUTO_EXPOSURE, 0)  # turn off autoexposure
30
31# configure and encode fringe patterns
32f = Fringes()
33f.mode = "sRGB"
34f.X = width
35f.Y = height
36I = f.encode()
37
38# record fringe patterns
39Irec = np.empty(shape=(f.T,) + image.shape, dtype=image.dtype)  # allocate empty image stack
40try:
41    for t in range(f.T):  # record fringe patterns in a loop
42        cv2.imshow("Fringes", I[t])  # display fringe pattern in fullscreen mode
43        cv2.waitKey(delay)  # wait delay time
44
45        ret, image = camera.read()  # capture the fringe pattern (AVOID OVEREXPOSURE !!!)
46
47        if ret:
48            Irec[t] = image  # save captured fringe pattern to image stack
49finally:
50    cv2.destroyWindow("Fringes")  # close window
51    camera.release()  # release camera resources
52
53# show recorded fringe patterns
54for t, frame in enumerate(Irec, start=1):
55    cv2.imshow(f"frame {t}/{f.T}", frame)
56    cv2.waitKey(0)
If the results look strange or wrong, please check out the troubleshooting. More complete code examples can be found in the examples directory.
1.2.2. CLI
You can run fringes directly from the command-line interface with option flags.
Encode the fringe pattern sequence and save it to image files pattern.png (the frame index will be automatically appended):
fringes pattern.png
Decode the (recorded) fringe pattern sequence from the input file(s) defined by the glob pattern pattern*.png and save the results in .npz format:
fringes -i pattern*.png decoded.npz
Note
-i are not specified,
the pattern sequence will be encoded.To list all options, call fringes with the help flag -h:
fringes -h