1.2. Usage
This package provides the handy Fringes class,
which handles all the required parameters
for configuring fringe pattern sequences
and provides methods for creating and analyzing them.
1.2.1. Command-line
You instantiate, parameterize and deploy the Fringes class:
from fringes import Fringes  # import the Fringes class

f = Fringes()                # instantiate the Fringes class
All parameters are accessible by the respective attributes
of the Fringes instance.
They are implemented as class properties
(managed attributes), which are parsed when setting,
so usually several input types are accepted
(e.g. bool, int, float for number
and additionally list, tuple, numpy.ndarray for array.).
Note that some attributes have sub-dependencies,
hence dependent attributes might change as well.
Circular dependencies are resolved automatically.
f.X = 1920                   # set width of fringe patterns to screen width
f.Y = 1080                   # set height of fringe patterns to screen height
f.K = 2                      # set number of sets
f.N = 4                      # set number of shifts
f.v = [9, 10]                # set spatial frequencies

T = f.T                      # get number of frames
For generating the fringe pattern sequence I, use the method encode().
It returns a Numpy array
in video-shape (frames T, width X,
height Y, color channels C).
I = f.encode() # encode fringe patterns
Now display each frame of the fringe pattern sequence on a screen and capture the scene with a camera according to the following pseudocode (an elaborated example is given below):
# allocate image stack
I_rec = []

for t in range(f.T):
    # display frame on screen
    frame = I[t]
    ...

    # capture scene with camera
    image = ...

    # append to image stack
    I_rec.append(image)
For analyzing (recorded) fringe patterns I_rec, use the method decode().
It returns the Numpy arrays brightness a, modulation b and coordinate x.
a, b, x = f.decode(I_rec) # decode fringe patterns
Note
For the computationally expensive encode()-function
we make use of the just-in-time compiler Numba.
During the first execution, an initial compilation is executed.
This can take several tens of seconds up to single digit minutes, depending on your CPU and energy settings.
However, for any subsequent execution, the compiled code is cached and the code of the function runs much faster,
approaching the speeds of code written in C.
In your application, you can configure the
logging
of the fringes package like so:
import logging

formatter = logging.Formatter("%(asctime)s %(levelname)s %(name)s.%(funcName)s(): %(message)s")
handler = logging.StreamHandler()
handler.setFormatter(formatter)
logger = logging.getLogger("fringes")
logger.addHandler(handler)
logger.setLevel("INFO")
1.2.2. Minimal Working Example
The only hardware you need is a screen and a camera, cf. Fig. 1.1.
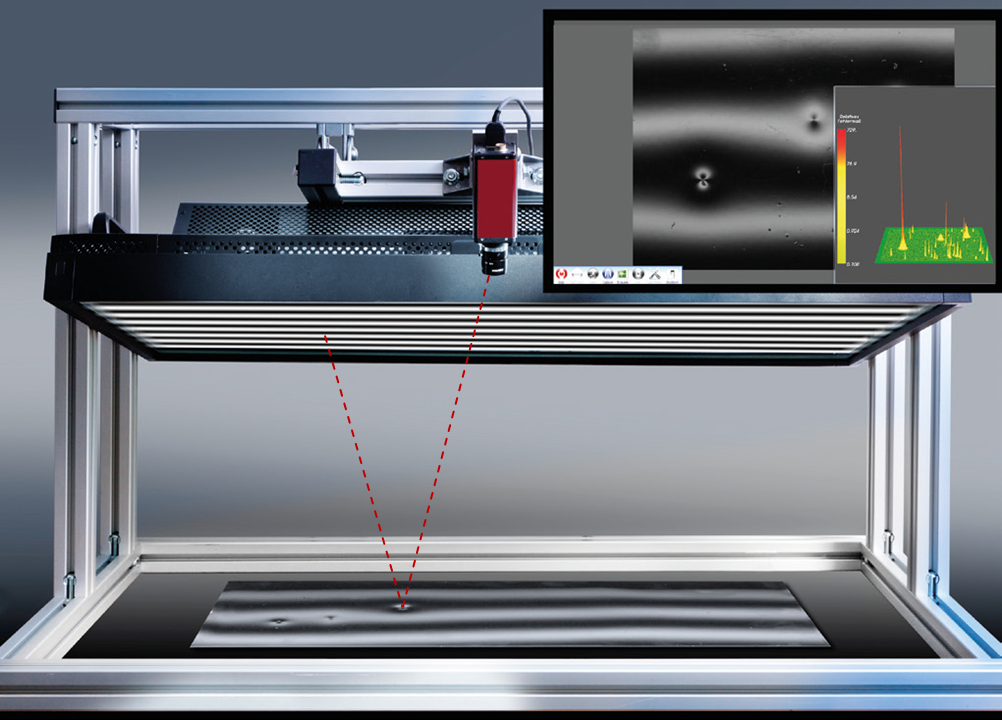
Fig. 1.1 Measurement setup for deflectometric inspection. From [1].
However, the setup can be as simple as only using your laptop’s screen and integrated camera, cf. Fig. 1.2

Fig. 1.2 Measurement setup.
Make sure the reflected fringe pattern is visible by the camera. Also, make sure to focus onto the test object and adjust the exposure settings of the camera. Then you can use the following code snipped to record and analyze your own dataset:
 1"""Use the `Fringes` package to encode, record and decode data."""
 2
 3import logging
 4
 5# configure logging (this is optional)
 6formatter = logging.Formatter("%(asctime)s %(levelname)s %(name)s.%(funcName)s: %(message)s")
 7handler = logging.StreamHandler()
 8handler.setFormatter(formatter)
 9logger = logging.getLogger("fringes")
10logger.addHandler(handler)
11logger.setLevel("INFO")
12
13import cv2
14from fringes import Fringes
15import numpy as np
16
17# prepare window in which the fringe pattern sequence will be shown in fullscreen mode
18cv2.namedWindow("Fringes", cv2.WND_PROP_FULLSCREEN)
19cv2.setWindowProperty("Fringes", cv2.WND_PROP_FULLSCREEN, cv2.WINDOW_FULLSCREEN)
20left, top, width, height = cv2.getWindowImageRect("Fringes")
21
22# prepare camera
23camera = cv2.VideoCapture(0)
24
25camera.set(cv2.CAP_PROP_AUTOFOCUS, 1)  # turn on autofocus
26camera.set(cv2.CAP_PROP_AUTO_WB, 1)  # turn on whitebalance
27camera.set(cv2.CAP_PROP_AUTO_EXPOSURE, 1)  # turn on autoexposure
28
29white = np.full((height, width), 255, np.uint8)  # white image
30cv2.imshow("Fringes", white)  # display white image
31key = cv2.waitKey(250)  # delay time of the screen for displaying the image
32
33for _ in range(10):
34    # let camera automatically set focus, whitebalance and exposure
35    ret, image = camera.read()
36
37camera.set(cv2.CAP_PROP_AUTOFOCUS, 0)  # turn off autofocus
38camera.set(cv2.CAP_PROP_AUTO_WB, 0)  # turn off whitebalance
39camera.set(cv2.CAP_PROP_AUTO_EXPOSURE, 0)  # turn off autoexposure
40
41# configure and create fringe pattern sequence
42f = Fringes()
43f.X = width
44f.Y = height
45I = f.encode()
46
47# allocate empty image stack
48I_rec = np.empty((f.T,) + image.shape, image.dtype)
49
50# record
51try:
52    # record fringe patterns in a loop
53    for t in range(f.T):
54        # display fringe pattern with index 't' in fullscreen mode
55        cv2.imshow("Fringes", I[t])
56        key = cv2.waitKey(250)  # delay time of the screen for displaying the image
57
58        # capture reflected fringe pattern; ensure the fringe pattern is not overexposed!
59        ret, image = camera.read()  # note: OpenCV has color order 'BGR' (instead of 'RGB') for color images
60
61        if ret:
62            # save captured fringe pattern to image stack
63            I_rec[t] = image
64finally:
65    # close window
66    cv2.destroyWindow("Fringes")
67
68    # release camera resources
69    camera.release()
70
71# analyze recorded fringe pattern sequence
72a, b, x = f.decode(I_rec)
If the results look strange or wrong, please check out the troubleshooting.
1.2.3. Graphical User Interface
Do you prefer to interact with a GUI? Fringes has a sister project which is called Fringes-GUI: https://pypi.org/project/fringes-gui/.
You can install Fringes-GUI directly from PyPi with pip:
pip install fringes-gui
Then you import the fringes-gui package and call the function run().
import fringes_gui as fgui
fgui.run()
Now the graphical user interface should appear:
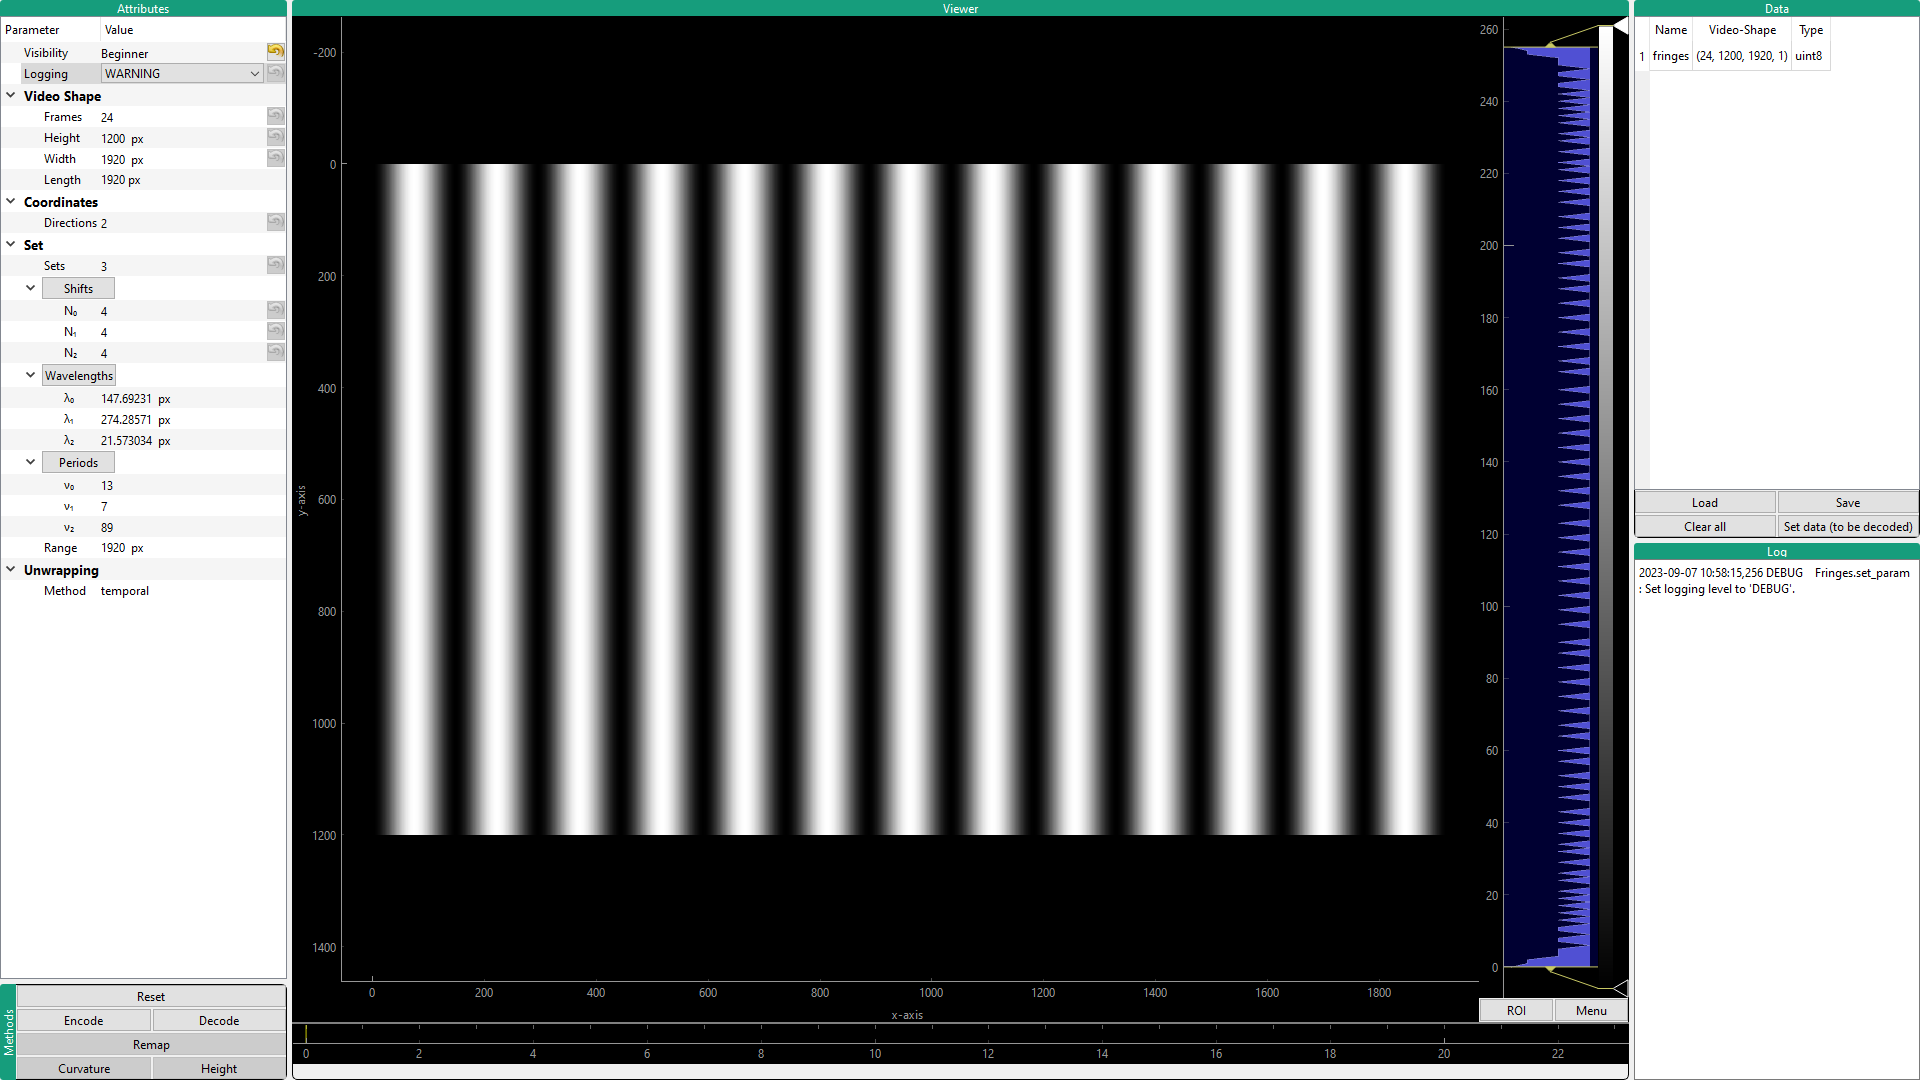
Fig. 1.3 Screenshot of the GUI.
1.2.3.1. Attributes
The attribute widget is located in the top left corner.
It contains the parameter tree which contains all the attributes
of the Fringes class.
If you select a parameter and hover over it, a tool tip will appear,
containing the docstring of the respective attribute of the Fringes class.
The attribute Visibility does not affect the functionality of the parameters but is used by the GUI to decide which parameters to display based on the current visibility level. The purpose is mainly to ensure that the GUI is not cluttered with information that is not intended at the current visibility level. The following criteria have been used for the assignment of the recommended visibility level:
Beginner (default):
Parameters that should be visible in all levels via the GUI. The number of parameters with Beginner level should be limited to all basic parameters so the GUI display is well-organized and easy to use.
Expert:
Parameters that require a more in-depth knowledge of the system functionality. This is the preferred visibility level for all advanced parameters.
Guru:
Advanced parameters that usually only people with a sound background in phase shifting can make good use of.
Experimental:
New features that have not been tested yet. The system might crash at some point.
Upon every parameter change, all parameters of the Fringes instance are saved
to the config file .fringes.yaml in the user home directory.
When the GUI starts again, the previous parameters are loaded.
To avoid this, just delete the config file
or press the reset button in the Methods widget to restore the default parameters.
1.2.3.2. Methods
In the bottem left corner you will find action buttons
for the associated methods of the Fringes class.
Alternatively, you can use the keyboard shortcuts which are displayed when you hover over them.
The buttons are only active if the necessary data is available, i.e. was encoded, decoded or loaded.
1.2.3.3. Viewer
In the center resides the viewer. If float data is to be displayed, nan is replaced by zeros.
1.2.3.4. Data
The data widget is located in the top right corner. It lists the data which was encoded, decoded or loaded.
In order to keep the parameters in the Parameter Tree consistent with the data,
once a parameter has changed, certain data will be removed
and also certain buttons will be deactivated.
Also, the data has to fit in order to be able to execute certain functions.
As a consequence, if you load data - e.g. the recorded fringe pattern sequence -
the first element of its video-shape
has to match the parameter Frames
in order to be able to decode it.
To display any datum listed in the table in the Viewer, simply select the name of it in the table.
Click the Load button to choose data or a config file to load.
With the Save button, all data including the parameters are saved to the selected directory.
Use the Clear all button to delete all data.
Note
When data is loaded, it is automatically transformed into video-shape.
Note
By default, the datum fringes is decoded.
If you want to decode a datum with a different name (e.g. one that you just loaded),
select its name in the table and click Set data (to be decoded).
1.2.3.5. Log
The logging of the Fringes class is displayed here.
The logging level can be set in the Parameter Tree.